jUpscaler - AI upscale any image/video to 4k [Real-ESRGAN GUI]
A downloadable tool for Windows
[Description]
This is application for upscale any image or video to higher resolution. Its works great specially with anime and cartoons.
The base program isn't mine i just made the Graphical User Interface for it.
More information here:
- interpolation Alghorithm: https://github.com/nihui/rife-ncnn-vulkan
- upscaling Algorithm: https://github.com/xinntao/Real-ESRGAN
- converting video: https://ffmpeg.org
[How to use]
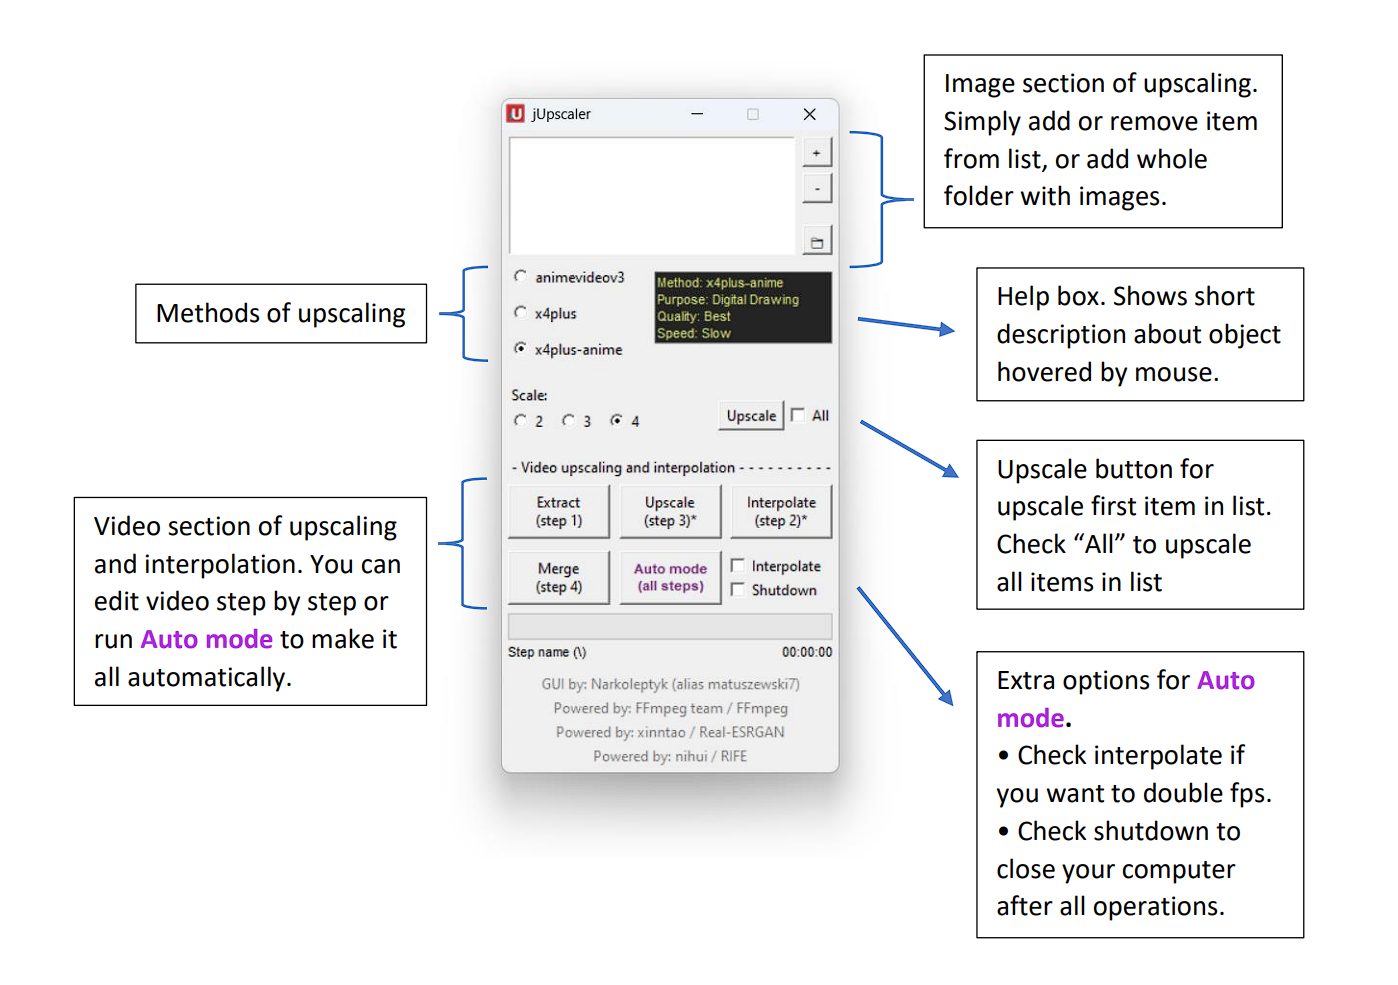
1) Simplest way is click on the "auto mode" button , select video and choose an empty folder for the extracted frames.
2) For upscale images, add file by clicking on "+", choose upscale method, scale and click "Upscale"
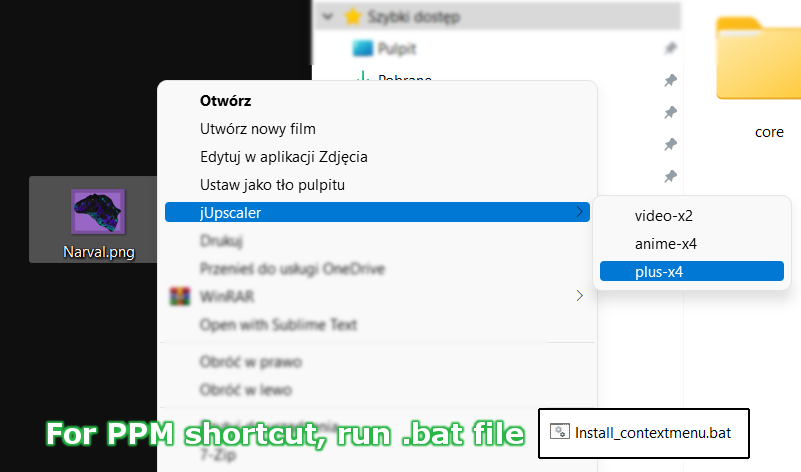
3) If you install context menu (installation file inside "core" folder), you can quickly upscale image by clicking right mouse button and selecting jUpscaler
4) For upscale images into folder, add folder by clicking button with folder icon.
[Result]


For more dinosaurs check twitch user: https://www.twitch.tv/kanapkozaur
Download
Click download now to get access to the following files:
Development log
- New update 2.2 - av1 avaiableAug 22, 2023
- fps setting fixedNov 16, 2022
- New update - interpolation!Nov 14, 2022

Comments
Log in with itch.io to leave a comment.
Congrats for this tool. I tried a LOT of upscaler recently, yours is the best for me.
Hi Matuszewski, First of all I really like your the upscaler that you have built. Very useful - more than it lets on. Ability to either automate or pick stages is a god send capability. Sometimes i have noticed that during merge, the video output is incomplete (i.e. finished video is less than the actual duration). At that time, i run the merge again to create a new video from the interpolated-upscaled images without restarting from begining.
I have also used Waifu2x Extension from AArong - but your quality output is somehow better? Videos with burned in subtitles does not glitch in the upscaled output. His does for some reason. Also your interpolation is somehow much smoother too?
However, i have a feedback. Your upscaler is stuck to H.264 - not even H.265 or AV1. Yes, H.264 is most stable but since we can use merge option for failed encodes, we do not have to worry. Please add AV1 as an option in the output. Don't bother with any of the hardware encoders they are hot garbage anyways.
I need your help - I have tried to change the 'GUI.pyw' to include AV1 encoding:
-vsync cfr -c:v libsvtav1 -qp 42 -preset 7 -svtav1-params tune=0:enable-tf=0:enable-overlays=1:enable-qm=1 -pix_fmt yuv420p10le
Instead of the H.264 output video line in merge section.
I confess i am very poor at coding because i tried to save the GUI.pyw file after editing but the output is still H.264? I checked all instances of ffmpeg and try to specify the above line but its not taking at all.
As a disclaimer, i would like to state that the above experiment was only for my own personal home use and no other purpose since i wanted AV1 level compression to work with your excellent upscaler.
Kindly let me know.
Hey, honestly I abandoned the project but I'm at home for two days, I'll see if I can do something.AV1 has a royalty-free licensing model so i think i could add it.
Thank you so much for doing this! Your project will continue to be useful for many years to come.
Hello, I was just playing around with adding AV1 to the program, and I have some bad news. After changing the encoder from x264 to AV1, the video rendering takes several minutes instead of just a few seconds. I tried to figure it out for an hour, but I couldn't make it work. I know AV1 itself is slow in rendering, but this difference is quite big. However, if you'd like to give it a try, all you need to do is change "libx264" to "libaom-av1" in lines 246 and 622 of the GUI.pyw file. Keep in mind that you can't launch the program through GUI.exe then and you'll have to run it directly from GUI.pyw using Python.
Thanks for trying. It is a real shame about aom-av1. Though have you tried libsvtav1 instead? The svt-av1 is much faster encoding than libaom-av1.
I read about SVT-AV1, and apparently, it's faster, but the quality is terrible. However, I checked available codecs in FFmpeg once again, and indeed, there are more to choose from (previously, I didn't expand the terminal window :P). I tried other encoders, and they are much faster (around few seconds). The whole idea of the program is "do it automatically," so I need to figure it out how to detect the most optimal encoder when the program starts. An update is coming soon.
Update added. Several changes + a new upscaling method for general use. It seems to me that it's not so much that you don't understand programming, but rather that my code was quite messy, which is why it took so long.
Is there a minimum requirement to run this?
No there is not. I assume you're asking about the requirement for Nvidia graphics cards, but this version also works on AMD cards as well as integrated chipsets (cpu). Just a weaker computer specification will increase upscaling time.
Thanks for the great work! I do run into one problem, both in the previous version, as well as in v2 when using video as an input.
Using videos with integer FPS, such as 30fps, 25fps, etc, no problems with auto mode or auto FPS option.
However, videos with film-type FPS, e.g. 23.976, output at 23fps with desynchronized audio. In the previous version, when I tried manually inputting 23.976 fps in the box, the video would be extracted and upscaled, but the merge/mux step never occured. Entering an integer fps works as expected, though with the expected audio desync issue from lengthening or shortening the video track duration.
The current v2 appears to no longer have this FPS input option, and truncating the output fps to 23fps is still the behavior observed.
My untrained suspicion is somewhere along the way, when the source file's FPS is read to be automatically matched in the output, the decimal gets truncated, either when read or when sent to ffmpeg. I don't have any other non-integer framerate videos to try at the moment, though I suppose I could find/make one to test on, like a 29.97 or 59.94 fps file to see if it outputs 29 or 59 fps.
If passing the full decimal value is not possible, perhaps rounding to the nearest integer rather than truncating would be acceptable.
Example:
35484 frames source at 23.976fps -> 24.67 min original length
23.000 -> 25.71min (+1.04min or 62.4s) very desync by end, noticable early
24.000 -> 24.64min (-0.03min or 1.8s) much closer, only slightly noticable throughout
Of course, this would be worse for much longer source videos than half hour anime.
Sorry for the wall of text. Again, thanks for the work on the app, it is already proving useful beyond this edge case. The batch image file upscaling particularly is really great.
Thanks!
Can confirm: 29.97 video input results in output 29.00 fps video.
Also noticed that only first audio track and no subtitle tracks get muxed into the final output file when multi-audio is present. Possibly a future feature to consider :D
Probably just do a batch/shell script for the other audios/subs and fix the framerate after running the upscaler
Oh, thanks for feedback. I probably know what is problem with 23.976fps i'll try to fix that quickly.
"Also noticed that only first audio track and no subtitle tracks get muxed into the final output file when multi-audio is present." - this will be harder to fix i think. Maybe few days fixing.
Anyway, do you want to turn back manual fps setting? I thought no one is using this, but now i see i was wrong.
I don't think the manual fps is necessary if the auto mode can catch the non-integer framerate and pass them along the chain.
The only time I've intentionally altered fps has been to match audio/subs from other sources, like if I have good audio from one file, but good video from another, and one is 25fps and the other is 23.976. Other methods are more appropriate for dealing with that case though.
Thanks!
The fps issue should be fixed.
The audio/subtitles things, will be fixed soon i think.
Thanks. I've been trying it since the release and it works. I've only found one case in which it doesn't, which is videos which have soft telecine 3:2 pulldown that play in 29.97fps but are stored in original source framerate of 23.976fps. The playback device/software uses these tags that tell it which frames to duplicate to output 29.97 from the film source 23.976.
Here's an example of such an anime video's mediainfo output
The actual framerate is 23.976 or 24fps based on the # of frames, but the file contains those pulldown tags to specify which frames get duplicated by the player. This allows fewer actual frames to be encoded and stored, by not encoding the duplicates to save space.
When used as an input file, this produces a video stream that is 29.97 fps, but has a shorter duration than the original file and its audio tracks because the duplicate frames were not included and upscaled, and the soft pulldown tags are not retained. The resulting file runs out of video before the audio track ends.
When I use ffprobe -i on the file, 29.97 fps and 29.97 tbr are reported for the video stream.
I suspect this should be fixable, as if I use jUpscaler to extract and upscale the frame images, then run
.\ffmpeg.exe -y -r 23.976 -i ..\upscaled_frames\frame%08d.jpg -i '.\testin.mkv' -map 0:v:0 -map 1:a? -map 1:s? -c:a copy -c:s copy -c:v libx264 -r 29.97 -pix_fmt yuv420p testout.mkv
I get the desired result, with everything in sync, with the upscaled video stream, 23.976 stored fps, 29.97 playback fps, and all audio and subtitle streams copied over. Mediainfo says the file is vfr,
So keeping all audio and subtitle streams should be as easy as adjusting the ffmpeg calls jUpscaler makes, instead of -map 1:a:0?, use -map 1:a?; and same for subtitle, -map 1:s?
If an input file has no subtitle tracks, this should not throw any errors about it.
I don't know how to detect the 23.976 pulldown thing to do this automatically when needed, but for now I can just extract and upscale and batch run this ffmpeg argument set.
Thanks for all your hard work! Hope this info is useful.
guis good, just a tip for people using this but want to use more models then the ones included, here's a three step tutorial on how to get the right model files to swap out on the GUI Step 1: download cupscale, get the model that you want from https://upscale.wiki/wiki/Model_Database, select the realesrgan option on cupscale, drag an image into it, and then run it, that converted the model you wanted into bin and param files Step 2: go to .ncnn models in the cupscale folders and find the folder for the model you want, copy the bin and param files and then paste it into the models folder on jupscaler step 3: change the file name to the name of the model that you wanna swap with the other model, once it asks if you wanna replace the file you want to swap with the other model hit yes
Oh, thanks for information i didnt know that. Probably i include a few of those in future.
if you do that maybe include a 1x model option in the app for video clean up esrgan models
Well, i couldn't add the new methods because the are for ESRGAN not for Real-ESRGAN. Even if there is few of them, they don't work with converter. I will look closer for ESRGAN engine and if it works with non-nvidia cards i will try to implement
i made a mega link with some converted esrgan models, if you need that or something, here https://mega.nz/folder/CQggyLaB#Zz57uPUItv49njiyjmEkBw
Thanks for comment!
1 - well, the upscale methods isn't mine, just for clear. My observation is
a) animevideov3 - the fastest method (couple of times than the others) and usually the best for anime video, but not soo good for images
b) x4plus - meh... its not so good for anything. Sometimes the best for images but its like 1 to 20.
c) x4plus-anime - the best for 2d images, like anime or fan art from deviant art and similar. I use it for anime video, but it takes sooo long and the result not so good, i prefer use animevideov3
2 - definitely x4plus-anime
3 - Auto mode takes already selected mode, so you have to change it before clicking auto mode button. I suggest to choice animevideov3 mode and x2 scale. This way makes you the fastest and the most quality result.
Remember that, this upscale methods is for 2d. For more information look at https://github.com/xinntao/Real-ESRGAN